Monday, 31 October 2016

Minor Project Matte Painting Attempt 1 Development

What am I doing?

For my Minor project, I am attempting to create at least 2 matte paints using adobe after effects. My goal is to extend on the knowledge I have with visual effects, in after effects, by doing a visual effect that is new to me. This test is made up of clips I have recorded and some free to use stock images from Pexels.


How have I gone about doing it?

The original footage
The first thing I have done is brought in some original footage that was shot on the Black Magic Camera in Seaton Carew. I mainly was looking for a field or some grass to work on. The first thing I did was add a bit more colour and saturation since the original clip looked slightly dull in colour.


These were just basic skills I already know how to do but have been useful in this process. However, for the idea I had for using this footage only included the grass areas and therefore, I used the masking technique.


I could have possibly used an actor stand on the grass looking out on to the horizon but for this project, I also want to practice green screening since I have never properly used it before. So it was nice to get the movement of the grass in the slight wind so it is more realistic than using it in CGI.


Once I had my basic idea of what I wanted and where, I started looking at stock images of castles that I could add and experimented with them to see what looked best.


Once I chose my castle, I had to do some more masking and I sized it to the same size as the composition frame. This was because I was going to make it a 3D layer and move it in the composition as if it was 3D.


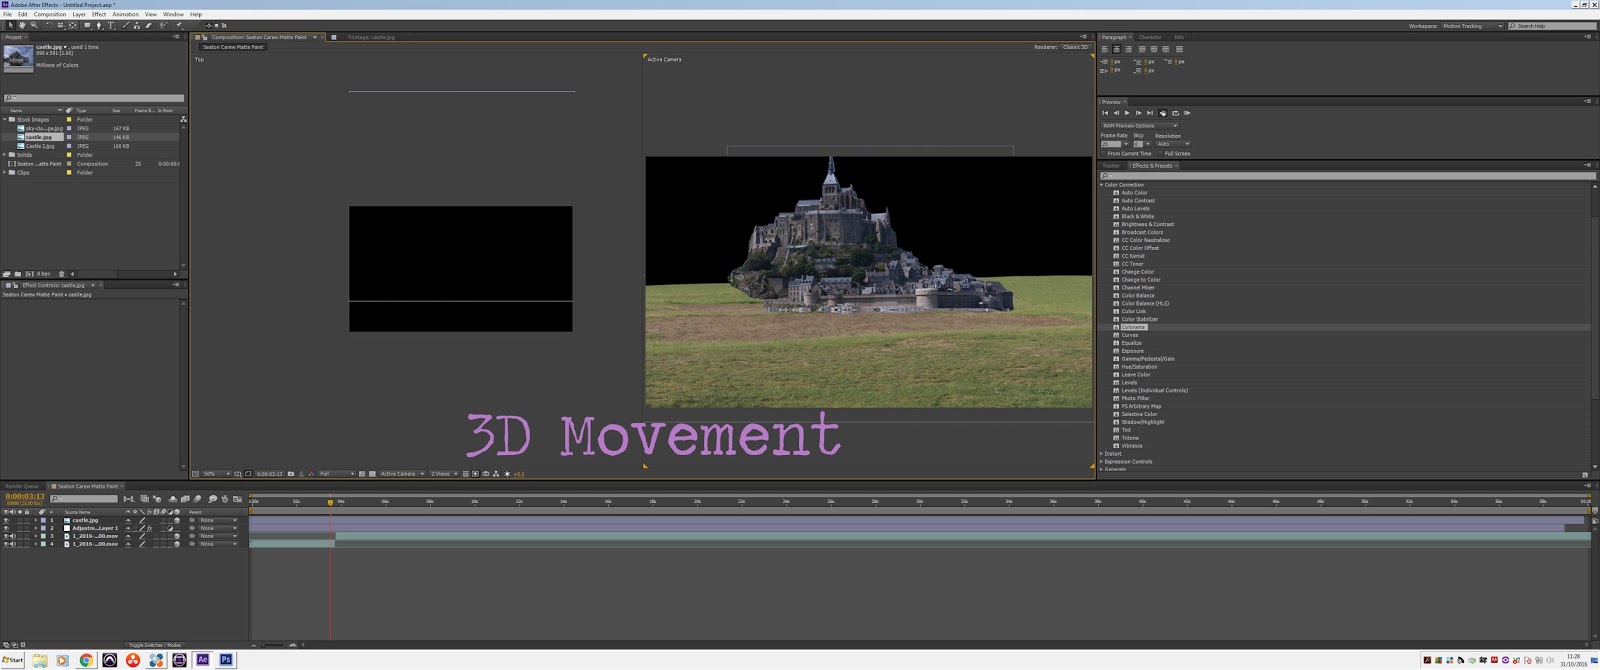
If I decide to use AE cameras later on, I will be able to if I make all the sections of the matte painting in a 3D layer. This also makes it easier later on if I want clouds to move in front and behind the castle in opposite directions.


The same idea occurs through the rest of the matte painting. In the above image, the sky and the sea are also from clips I shot on the Black Magic. One of the things I had to be careful of doing when adding in segments that weren't there is that it all needs to match in colour and tones. So I also played with the colour corrections a little more. Exploring the use of colorama (a new tool for me to try and colour with) and other tools such as curves, levels, hues & saturation.


Monday, 24 October 2016

Research into Matte Painting Effect

Matte Painting has been around since the mid 19th century well before movie cameras were a thing. The technique was used by photographers who were experimenting with double exposure. Matte Paints are mostly used as a background image whilst the actors would be in the foreground.

Thinking of a more traditional piece, matte paints are often a painted glass pane that is more likely to be done in production and used as an actual set piece combined with the actors.

A film in the past to use this technique would be Star Wars,

Time Code: 1.18

This video explains how one of the scenes in Star Wars with Ewoks was painted, leaving black gaps where the live action would be place, and then had 78 photos taken of it so that the shot would be just over 3 seconds. Once they had the 78 images of the matte paint, they would add the live action in using a projector and combining the two together.

In digital Matte Paints, they would usually add in the matte later on in post production once everything is filmed. Often using programs like Adobe After Effects. You can still digitally paint onto the canvas using a graphic tablet and pen but it is also possible to use other stock images. A quicker, yet still effective, way of adding what is not actually there.

A more modern day film that uses digital Matte Painting is Harry Potter,

Time Code: 0.58

This video is a useful for showing the VFX breakdown of how it is added on. Before and after.

This is one of the very first tutorials that I watched to gain an understanding of how some filmmakers will go about attempting to Matte Paint


This is how I plan to attempt to do this. By using stock images and manipulating them in creative ways to attempt to create the illusion of something, more, there.

Friday, 14 October 2016

Creating the Water Fall Matte Paint (with stock images)


The waterfall matte, that I created, was used with completely photos from free stock websites so that I could experiment. This took me a long time primarily because of the fact I cut each image out in Photoshop first and then imported it into After Effects.

AE was where everything was place together and manipulated into a new image. I also spent some time trying to create a waterfall and CGI the water. One of the most difficult parts of this was trying to make it all look as if it is real.


The composition is predominantly made up of layers that have been colour corrects and changed in size.
I spent a lot of time using masking and 3D layers to create a depth of
field.

The final piece had quite a few issues but it helped me to gain an understanding to begin a piece using my own footage.

This video is a tutorial I loosely followed to gain an understanding of creating waterfalls. The main issue was, I was working on a more newer version of AE and this lead me to having to figure out and play with tools that were similar, but a bit different.

Instead of the particles he used, I had to use particle world CC instead and mess around with the different settings within that. However, it used the same basic understanding. It would have been a lot harder if I didn't have some knowledge with AE previously.

Week 2,3 & 4: Developing ideas for minor project

Week 2 (26/09/16)

I have began preparing a pitch for my minor project. This week, I am hoping to get some test footage to help me present my idea and also begin experimenting before creating a final piece. This will include some small green screen experiments to help me pitch an idea. Since I have some visual effects I can do for another student, we will be working in collaboration together. However, if I don't have enough footage from that, then I have been thinking about extending my knowledge to look at animation in film. Therefore, I plan to do some research into that in the next couple of weeks.

Week 3 (03/10/16)

This week I have been mainly researching into some visual effects techniques and trying to develop some ideas. Hopefully by next week, I will be able to put some of my research into practice. However, there hasn't much more progressed in the practical side this week.

Week 4 (10/10/16)

This week I pitched my idea and all went well. However, after pitching, even though all was well with what I proposed to do, the person I was collaborating with changed their idea which has left me to figure something out that will be enough to meet all requirements. In my research, I was looking up on Matte Painting, this way I can still also look into some green screening, to place a person into the scene afterward, and use techniques I have and develop them to create new ones.


Monday, 3 October 2016

MP Research: Sodium Screen Vapor Process


Animation mixed with Live Action 

As part of my research, I will be looking into films that use 2D animation that mixes with live action and then continue to look at how that has developed into modern day movies with 3D animation and live action. In this post, I will be focusing on Sodium Screen Vapor Process.

Bedknobs and Broomsticks & Mary Poppins

This film was produced by Walt Disney Productions in 1971. It is filled with special effects particularly a technique that is known as 'Sodium Screen Vapor Process'. This technique can occasionally also be referred to as 'Yellow Screening'

http://www.fanpop.com/clubs/bedknobs-and-broomsticks/images/32846157/title/bedknobs-broomsticks-photo

http://www.fanpop.com/clubs/bedknobs-and-broomsticks/images/32846157/title/bedknobs-broomsticks-photo


This technique was used to combine actors, in real life enviroments, to background footage. In this case, it was in a fantasy, cartoon world like in the image below:


Image result for Bedknobs and Broomsticks
http://moviemezzanine.com/bedknobs-and-broomsticks-blu-ray-review/


Sodium Screen Vapour Procress

'The Sodium vapor process used actors, who were lit normally, standing in front of a white screen which was lit by powerful sodium vapor lights'
 This particular process was done a lot in Hollywood in the 60s and 70s by Disney. Mary Poppins is another example. The process is done using an old three strip technicolor camera and a special prism.


Sodium-Vapor-Process
http://filmmakeriq.com/lessons/hollywoods-history-of-faking-it-the-evolution-of-greenscreen-compositing/
Whilst shooting on a yellow screen, a wavelength of sodium vapor (yellow) would split off and make the background white whilst the other wavelengths split off and took the image of the lit actor. This left a black silhouette on the white background, known as a black and white matte. This then left the lit actor without a background so that filmmakers could add to it.


Yellow screening was just a step away from developing into modern day technology, green screening.